
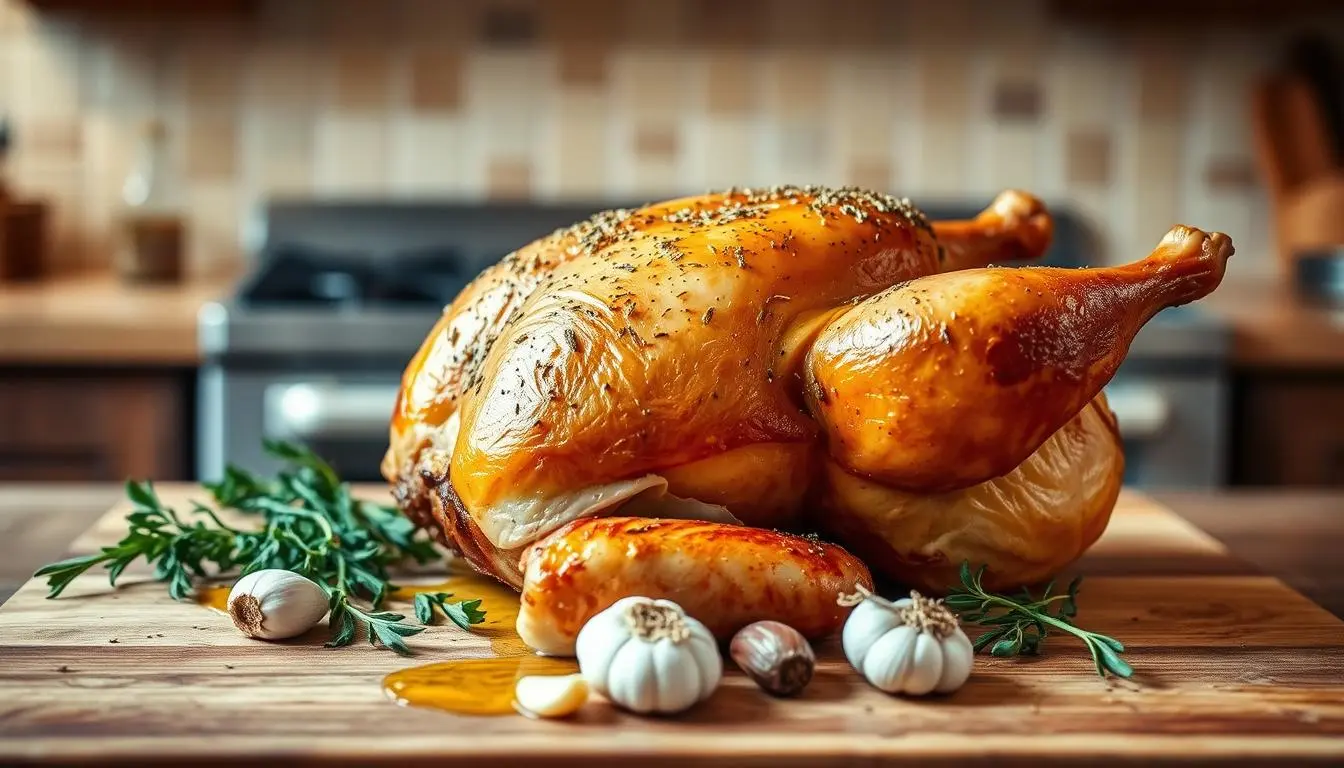
There’s something incredibly satisfying about preparing a meal that’s both simple and delicious. For me, bone-in, skin-on chicken has always been a go-to choice. It’s juicy, flavorful, and surprisingly easy to cook. Whether I’m hosting a dinner or just cooking for myself, these recipes never fail to impress.
Thank you for reading this post, don't forget to subscribe!
What I love most about using bone-in chicken is the extra flavor it brings. The skin crisps up beautifully, creating a golden, herb-crusted exterior that’s hard to resist. Plus, it’s versatile—perfect for roasting, grilling, or even slow cooking. In just about an hour, you can have a hearty, protein-packed meal ready to serve.
In this guide, I’ll walk you through everything from selecting the best chicken to prepping and cooking it to perfection. Whether you’re a seasoned cook or just starting out, these recipes are designed to make your life easier. Let’s dive in and discover how to create meals that are both simple and unforgettable.
Key Takeaways
- Bone-in, skin-on chicken adds extra flavor and juiciness to your meals.
- These recipes are quick and easy, perfect for busy weeknights.
- Herb-crusted skin creates a crispy, delicious exterior.
- Versatile cooking methods include roasting, grilling, and slow cooking.
- Perfect for impressing guests or enjoying a cozy dinner at home.
Introduction to Easy Split Chicken Breast Recipes
Cooking with bone-in chicken brings a depth of flavor that’s hard to beat. Whether you’re a seasoned chef or just starting out, this cut is a fantastic choice for creating meals that are both simple and delicious. Let’s dive into what makes it so special.
What is a Split Chicken Breast?
A split chicken breast includes both the bone and skin, making it a flavorful and juicy option. Unlike boneless cuts, the bone helps retain moisture during cooking, while the skin crisps up beautifully. This combination creates a meal that’s rich in taste and texture.
Why I Love Bone-In Chicken
I’ve always preferred bone-in chicken for its unbeatable flavor. The bone adds richness, and the skin becomes golden and crispy when roasted. Plus, it’s incredibly versatile—perfect for grilling, baking, or slow cooking.
One of my favorite ways to prepare it is with simple ingredients like garlic, olive oil, and herbs. These additions enhance the natural flavors without overpowering them. Using a roasting pan ensures even cooking and a perfect finish every time.
Here’s a quick comparison of bone-in vs. boneless chicken:
| Feature | Bone-In Chicken | Boneless Chicken |
|---|---|---|
| Flavor | Rich and deep | Milder |
| Moisture | Retains juiciness | Can dry out faster |
| Cooking Time | Slightly longer | Quicker |
Now that we’ve covered the basics, let’s move on to gathering the right ingredients for your next meal.
Gathering Ingredients and Essential Tools
The secret to a flavorful dish lies in the quality of your ingredients and equipment. Whether you’re a seasoned cook or just starting out, having the right items on hand makes all the difference. Let’s dive into what you’ll need to create a juicy, delicious meal.
Key Seasonings and Spices
Seasonings are the heart of any great recipe. For this dish, I recommend using Italian seasoning, paprika, and kosher salt. These add depth and warmth to the flavor profile. Don’t forget a tablespoon of olive oil to bring everything together. It’s a simple addition, but it makes a world of difference.
Fresh herbs like thyme and oregano can elevate the taste even further. If you’re feeling adventurous, a pinch of cayenne pepper adds a subtle kick. The key is to measure your seasonings accurately to ensure a balanced flavor.
Recommended Equipment for a Juicy Meal
Having the right tools is just as important as the ingredients. A quality roasting pan ensures even cooking and helps the skin crisp up perfectly. I also swear by an oven thermometer to monitor the temperature accurately. This small tool can prevent overcooking and keep your meat juicy.
Other essentials include a basting brush for applying oil and a sturdy cutting board for prep work. Even simple tools like these can enhance the overall flavor and texture of your meal.
| Tool | Purpose |
|---|---|
| Roasting Pan | Ensures even cooking and crispy skin |
| Oven Thermometer | Monitors temperature for perfect results |
| Basting Brush | Applies oil evenly for flavor |
With these ingredients and tools, you’re ready to create a restaurant-quality dish at home. Next, we’ll walk through the cooking process step by step.
Step-by-Step Cooking Process
A perfectly cooked meal starts with the right preparation and technique. Whether you’re a beginner or a seasoned cook, following these steps ensures juicy, flavorful results every time.
Prepping and Marinating the Chicken
Start by patting the meat dry with paper towels. This helps the seasoning stick better. Next, brush it with a tablespoon of olive oil. This adds moisture and helps the spices adhere.
For the seasoning mix, combine Italian seasoning, paprika, and kosher salt. Rub this blend evenly over the meat. Let it marinate for at least 15 minutes. This step enhances the flavor and tenderizes the meat.
Proper Oven Setup and Temperature Guidelines
Preheat your oven to 400°F. Proper preheating ensures even cooking and a crispy exterior. Use an oven thermometer to verify the temperature. This small tool prevents undercooking or overcooking.
Place the meat in a roasting pan, skin side up. This allows the heat to circulate evenly. If you’re cooking multiple pieces, leave space between them for better airflow.
Determining the Perfect Cooking Time
Bone-in meat takes a bit longer to cook—about 45 to 60 minutes. Check the internal temperature with an instant-read thermometer. It should reach 165°F in the thickest part. This ensures it’s safe to eat while remaining juicy.
Let the meat rest for 5 minutes after cooking. This allows the juices to redistribute, keeping it moist and flavorful.
| Step | Time | Temperature |
|---|---|---|
| Preheating | 10 minutes | 400°F |
| Cooking | 45-60 minutes | 400°F |
| Resting | 5 minutes | Room Temp |
By following these steps, you’ll create a meal that’s both delicious and satisfying. Happy cooking!
Split Chicken Breast Recipes
Creating a meal that’s both easy and flavorful is a joy every home cook deserves. This classic roasted recipe is perfect for busy weeknights or special dinners. With simple ingredients and straightforward steps, you’ll have a dish that’s juicy, crispy, and packed with flavor.
Classic Roasted Split Chicken Instructions
Start by preheating your oven to 400°F. Pat the meat dry with paper towels to ensure the seasoning sticks well. Brush it generously with a tablespoon of olive oil. This helps the spices adhere and adds moisture during cooking.
For the seasoning, mix 1 teaspoon of kosher salt, ½ teaspoon of paprika, and ½ teaspoon of garlic powder. Rub this blend evenly over the meat. Let it sit for 15 minutes to marinate. This step enhances the flavor and tenderizes the meat.
Place the meat in a roasting pan, skin side up. This allows the heat to circulate evenly, ensuring a crispy exterior. Roast for 45 to 50 minutes, or until the internal temperature reaches 165°F. Use an instant-read thermometer to check for doneness.
Let the meat rest for 5 minutes before serving. This allows the juices to redistribute, keeping it moist and flavorful. Pair it with your favorite sides for a complete meal.
| Step | Time | Temperature |
|---|---|---|
| Preheating | 10 minutes | 400°F |
| Roasting | 45-50 minutes | 400°F |
| Resting | 5 minutes | Room Temp |
This recipe is versatile and works well as a standalone dish or part of a one-pot meal. The bone-in cut retains more flavor and moisture, making it a favorite for many. Enjoy the crispy skin and rich taste that this dish brings to your table.
Enhancing Flavor Through Seasoning and Marinades
Unlocking the full potential of your dish starts with the right seasoning and marinades. The right blend of spices and herbs can transform a simple meal into something extraordinary. Let’s explore how to customize your flavors and make the most of your ingredients.
Customizing Your Spice Blend
Creating a custom spice blend is all about personal taste. I love starting with a base of paprika and garlic powder. These add warmth and depth without overpowering the meat. For a bit of heat, a pinch of cayenne pepper works wonders.
Here’s a simple ratio I use: 1 part paprika, 1 part garlic powder, and ½ part kosher salt. This ensures a balanced flavor. Feel free to experiment with other spices like Mediterranean herbs or black pepper to suit your preferences.
Using Herbs and Olive Oil Effectively
Herbs and olive oil are essential for boosting flavor. Fresh thyme and oregano add a vibrant, earthy taste. I always drizzle a bit of olive oil over the meat before seasoning. This helps the spices stick and keeps the dish moist during cooking.
For bone-in cuts, the skin acts as a natural barrier, locking in moisture and flavor. This makes it ideal for absorbing marinades. A light coating of olive oil ensures the herbs and spices meld perfectly, creating a rich, aromatic dish.
- Experiment with different spice combinations to find your favorite blend.
- Use fresh herbs for a more vibrant flavor profile.
- Apply seasoning evenly to ensure every bite is flavorful.
- Let the meat marinate for at least 15 minutes to enhance taste.
By tailoring your seasoning and marinades, you can create a dish that’s uniquely yours. Don’t be afraid to get creative—cooking is all about making it your own!
Serving Suggestions and Side Dishes
A well-rounded meal is all about pairing the main dish with the perfect sides. The right accompaniments can elevate your dining experience, adding both flavor and visual appeal. Let’s explore some delicious options that complement your meal beautifully.
Complementary Vegetables and Potatoes
Roasted vegetables are a classic choice. Potatoes, carrots, and Brussels sprouts work wonderfully. They’re easy to prepare and add a hearty touch to your dinner. Simply toss them in olive oil, season with salt and pepper, and roast until tender.
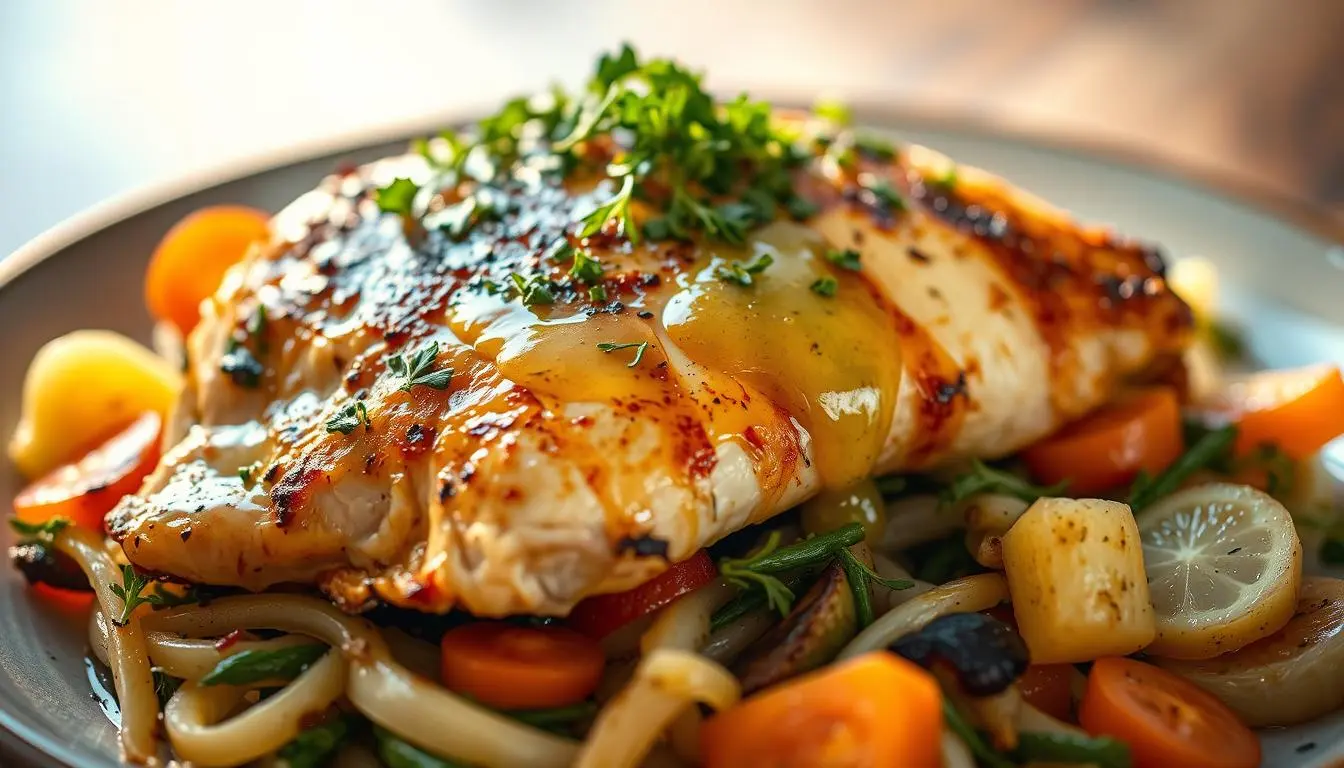
For a lighter option, try a fresh salad. A mix of greens, cherry tomatoes, and cucumbers pairs well with the savory flavors of the main dish. Add a simple vinaigrette for a refreshing finish.
Here’s a quick guide to pairing sides with your meal:
| Side Dish | Preparation Time | Flavor Profile |
|---|---|---|
| Roasted Potatoes | 30 minutes | Savory, Crispy |
| Steamed Green Beans | 10 minutes | Light, Fresh |
| Garlic Mashed Potatoes | 20 minutes | Creamy, Rich |
One of my personal favorites is a mix of roasted vegetables. It’s quick, versatile, and adds a pop of color to the plate. For more inspiration, check out these creative side dish ideas.
When plating, arrange the sides around the main dish for a balanced look. This not only enhances the visual appeal but also ensures every bite is flavorful. With these tips, you can create a meal that’s both satisfying and memorable.
Tips for Achieving Juicy and Crispy Skin
Achieving the perfect balance of juicy meat and crispy skin is an art worth mastering. With the right techniques, you can create a dish that’s both tender and flavorful. Let’s dive into some practical tips to help you get there.
Temperature, Timing, and Resting the Meat
Precision is key when it comes to cooking. Start by preheating your oven to 400°F. This ensures even heat distribution, which is crucial for crispy skin. Use an oven thermometer to verify the temperature for accuracy.
Cook the meat for about 45 to 60 minutes, depending on its size. Check the internal temperature with an instant-read thermometer. It should reach 165°F for safe consumption. This ensures the meat stays juicy while the skin crisps up beautifully.
After cooking, let the meat rest for 5 minutes. This allows the juices to redistribute, keeping it moist and tender. Skipping this step can result in dry meat, so patience is essential.
Extra Techniques for Added Crunch and Flavor
For extra crunch, try a final broil for 2-3 minutes. This gives the skin a golden, crispy finish. Keep a close eye on it to avoid burning.
Lightly dust the skin with extra seasoning before broiling. This adds a burst of flavor and enhances the texture. A mix of paprika and garlic powder works wonders.
Poking small holes in the skin’s fat deposits helps it render better. This technique ensures the skin becomes crispy without overcooking the meat.
| Step | Time | Temperature |
|---|---|---|
| Preheating | 10 minutes | 400°F |
| Cooking | 45-60 minutes | 400°F |
| Resting | 5 minutes | Room Temp |
By following these tips, you’ll achieve a dish that’s both juicy and crispy. Experiment with these techniques to find what works best for you. Happy cooking!
Conclusion
Cooking with bone-in cuts is a game-changer for flavor and juiciness. The crispy skin and tender meat make every bite unforgettable. With simple steps like preheating to 400°F and using a teaspoon of seasoning, you can create a restaurant-quality meal at home.
Don’t forget to let the meat rest for 5 minutes after cooking. This keeps it moist and locks in the juices. Experiment with herbs like thyme or oregano to add your personal touch. Pair it with roasted vegetables or a fresh salad for a complete dinner.
For more inspiration, check out this braised chicken recipe that combines tender meat and crispy skin. It’s perfect for any occasion and pairs well with your favorite sides.
I hope these tips inspire you to try new variations and enjoy the process. Cooking is all about making it your own. Happy cooking!
FAQ
What is a split chicken breast?
Why should I use bone-in chicken?
What are the best seasonings for split chicken breast?
What equipment do I need to cook split chicken breast?
How do I marinate the chicken for maximum flavor?
What’s the ideal oven temperature for roasting split chicken breast?
How long should I cook split chicken breast?
What sides pair well with split chicken breast?
How do I get crispy skin on my chicken?
Can I customize the spice blend for my chicken?
There are no reviews yet. Be the first one to write one.